

What is a Item ?
An “item” refers to a specific product, service, or SKU (Stock Keeping Unit) that is available for sale. Each item in the POS system corresponds to a distinct product or service that can be added to a customer’s transaction during a sale. Key characteristics of an item in a POS system include its name, description, price, and any other relevant details such as stock levels or variations. Items are typically organized into categories or departments to facilitate easy navigation and management within the POS interface. In summary, an item in a POS system represents an individual product or service that can be bought or sold, and it serves as the basic unit of inventory and transaction tracking within the POS environment.
How to Add a Item
Step 01: Click on Main items in the inventory group
Navigate to the section or menu in the system related to inventory management. Within the inventory menu, find the option or label that corresponds to “Main Items.” This could be a category or grouping used to organize items in a specific way. Execute the instruction by clicking on “Main Items.” This action should display or take you to a section where the main items within the inventory group are listed or managed.

Step 02: Click on Add Items
Access the area or menu within the system where the addition of items is managed. This could be an inventory management section or a specific module for adding new items. Within the designated section, find the option or button labeled “Add Items.” This is the interface element that initiates the process of adding new items. Execute the instruction by clicking on “Add Items.” This action typically opens a form or interface where users can input details about the new items they want to add, such as item name, description, price, and other relevant information.

Step 03: Select the department
Access the relevant area in the system where the addition of items is managed. This could be an inventory management module or a section specifically designed for adding new items. Within the item addition interface, find the option or field labeled “Department.” This is where users can choose the category or grouping to which the new item will be assigned. Execute the instruction by choosing the appropriate department from the available options. This categorization helps organize items within the system and aids in efficient inventory management.

Step 04: Give item code and ID name
- Item Code: This is a unique alphanumeric or numeric identifier assigned to each product or service in the POS system. It serves as a quick reference and helps in accurate and efficient tracking of items. Users need to input or assign a distinct item code for the product.
- Item Name: The item name is a human-readable label that identifies the product or service. It is how the item will be displayed on receipts, invoices, and other transaction documents. Users should input or specify the name that best describes the item

Step 05: Do the necessary updates in the pos bar
- Visible button – Navigate the settings or configuration section of the POS system. Identify the option or toggle that allows you to control the visibility to of the item. This could be a setting indicating whether the item is active or inactive. If you want to hide the item, you would “Visible” by toggling the setting to deactivate or hide the item within the POS system.

- Prompt price – Enabling the “prompt price” feature in a Point of Sale (POS) system empowers cashiers with the ability to edit the price of specific items during transactions. This feature provides flexibility for cashiers to adjust prices on the spot, accommodating scenarios such as negotiations, discounts, or unique customer circumstances. Essentially, it allows for dynamic and real-time modifications to the item price, giving cashiers greater control over pricing within the POS system.

- Enable Name – Navigate to the settings or configuration section of the POS system. Identify the option or toggle that enables the hiding of item names. This could be a setting indicating whether the item name is displayed or hidden. If you want to hide the item name, you would turn this one by toggling the setting to deactivate or hide the item name within the POS system.

- Printer 01(KOT Printer 01)Kitchen – Turning on this feature involves configuring the POS system to send order receipts to a specific printer. When a customer makes an order through the cashier, the system will automatically generate a receipt. Instead of printing the receipt at the cashier’s station, it will be directed to a printer situated in the kitchen. This is common in restaurants where kitchen staff need details about the order to prepare the food.

- ID Check – Enabling this feature involves configuring the POS system to generate a message or prompt for certain items. When a cashier processes the sale of an item for which this feature is turned on, the system will prompt a message, reminding or requiring the cashier to check the customer’s identity card. The illustration given involves selling alcohol, where legal regulations may prohibit sales to minors. If the cashier attempts to sell alcohol, the system will remind them to verify the customer’s age by checking their identity card.

- Enable Picture – Navigate to the settings or configuration section of the POS system. Identify the option or toggle that controls the display of item pictures. This could be a setting indicating whether the pictures are shown or hidden. If you want to hide item pictures, you would “turn this one” by toggling the setting to deactivate or hide the item pictures within the POS system.

- Pr.Description –
- Managers only – By turning on this feature in the POS system, a specific control mechanism is implemented. When this feature is enabled, it restricts cashiers from selling a particular item without additional authorization. To sell the specified item, the system demands manager permission. This typically involves entering a password or using some form of manager-level authentication.

- Kitchen Printer 02(KOT Printer 02) – Activating this option involves configuring the POS system to distinguish between the two kitchens. When a customer orders through the cashier, the system, based on the enabled option, directs the order receipt specifically to the printer located in the second kitchen. This feature streamlines order communication by ensuring that orders are sent directly to the relevant kitchen, allowing kitchen staff in the second kitchen to prepare and fulfill the orders efficiently.
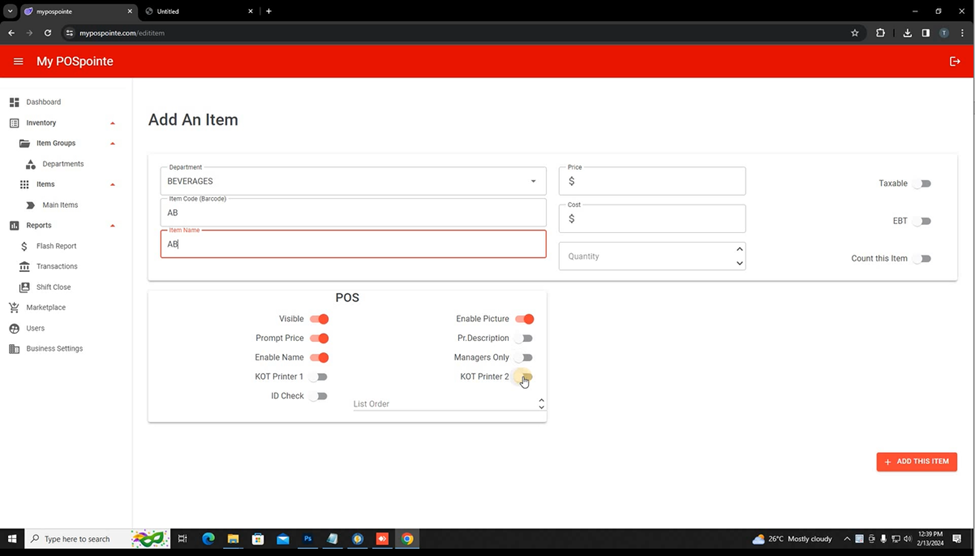
- List Order – This feature allows users to adjust the order or sequence in which items are displayed within a specific department. By selecting the number 1, users can prioritize the placement of a particular item at the top of the list within the department. By selecting the number 1, users can prioritize the placement of a particular item at the top of the list within the department.

Step 06: Give the price, cost and quantity of the item
- Price – This refers to the amount at which the item is sold. It is the retail or selling price that a customer would pay for the item.
- Cost – This represents the cost incurred by the business to acquire or produce the item. It includes expenses such as manufacturing, purchasing, or wholesale costs.
- Quantity – This denotes the number of units of the item available or in stock. It could refer to the total inventory count or the quantity available for sale.

Step 07: Select Taxable, EBT, count this item of the item you adding
- Taxable- This option refers to whether the item is subject to taxes. If the item is taxable, selecting this option ensures that the appropriate taxes are applied when the item is sold.
- EBT (Electronic Benefit Transfer) – EBT is a system for electronic payment of government assistance benefits. Selecting this option indicates that the item can be purchased using EBT cards, which are commonly used for food assistance programs.
- Count the item – This option likely pertains to tracking the quantity or inventory of the item. By selecting this option, the system will include this item in the overall count and management of available inventory.

Step 08 : Click “ADD THE ITEM” button to add the item to the pos system
Input the necessary information about the item, such as name, price, and other relevant details. Look for a button labeled “ADD THE ITEM” within the interface. This button is the trigger for finalizing the addition of the item to the POS system. Execute the instruction by clicking on the “ADD THE ITEM” button. This action saves the entered item details and incorporates the new item into the POS system. Navigate to the section or module in the POS system where users can input details for adding a new

How to edit item ?
Step 01 : Click the item
Navigate to the part of the system where items are listed or managed. Identify the item that you wish to edit within the list or interface. Execute the instruction by clicking on the specific item you want to edit. This action typically opens an editing interface where you can modify details such as price, description, or other relevant information.

Step 02 : Edit the item
Navigate to the section or interface in the system where item details can be modified. Locate the specific items for which you want to make changes within the system. Once you’ve selected the items, proceed to make the necessary changes. This could involve adjusting prices, updating quantities, changing descriptions, or any other relevant modifications. Once you’ve selected the items, proceed to make the necessary changes. This could involve adjusting prices, updating quantities, changing descriptions, or any other relevant modifications.

Step 03: Click on update
After accessing the item editing interface and modifying the necessary details, ensure that the changes accurately reflect the desired updates to the item. Find and click on the ‘Update’ button within the interface. This button is the mechanism to confirm and save the changes made to the item. By clicking ‘Update,’ the system processes and saves the modifications, ensuring that the updated information is stored for that specific item.

